


Salesforce Survey Implementation Guide

You can create and distribute surveys through Salesforce Survey – a native tool in the Salesforce platform. Surveys are a cool and effective way to gather feedback from customers, partners, employees, or other stakeholders.
The survey tool in Salesforce has an easy-to-use interface that lets you add various question types. You can add conditional logic to configure different questions based on a user’s feedback. You can customize surveys to be consistent with your branding regarding fonts, colors, and other visual elements. Surveys can be emailed, sent via social media, embedded in websites, or with other communication channels. It is possible to automatically send survey invitations based on specific triggers in your Salesforce instance. The responses are recorded in Salesforce. This gives you a central location from where to do analysis and reporting. Salesforce Surveys offers reporting tools with which you can visualize and analyze the survey data. You can create reports, dashboards, and charts to gain insights into the collected feedback. Salesforce Surveys can be integrated with other Salesforce objects and records. This means you can correlate Salesforce survey responses with customer records, cases, opportunities, and more. You can automate Salesforce actions based on survey responses using workflows, the process builder, or Apex triggers. For example, you could automatically create a case if a respondent reports an issue in a survey. Because Salesforce Surveys adhere to Salesforce’s security and privacy standards, you can rest assured that respondents’ data is handled securely and compliantly.
Salesforce Surveys are available in Enterprise, Performance, and Unlimited editions.
With Salesforce’s Survey Builder, you can create different types of surveys, such as customer satisfaction surveys, net promoter score surveys, employee engagement surveys, and product feedback surveys. With Salesforce Surveys, you can customize the styles and appearance of your surveys to match your branding. It lets you set up triggers to send surveys automatically to users based on certain criteria, such as after a purchase or after a service call. You can export the results of your surveys to Excel or other spreadsheet applications for further analysis.
Want to know how to learn everything you can about Salesforce? Watch the video below.
How to Use Salesforce Native Survey Tool
In the following steps, we will show you how to deploy a survey in Salesforce:
How to Create a Survey in Salesforce | Survey Implementation
1. Click the Gear icon in the top right corner of Salesforce to open the Setup.
2. Search for “survey” and click the Survey Settings option.
3. Use the toggle switch to enable Surveys.
4. Use the Experience Cloud Site drop-down list to select a community if you want to generate public survey invitations.

Create a Survey In Salesforce
1. Click the App Launcher icon and search for “survey”.
2. Click the Surveys option.

3. Click the New button.

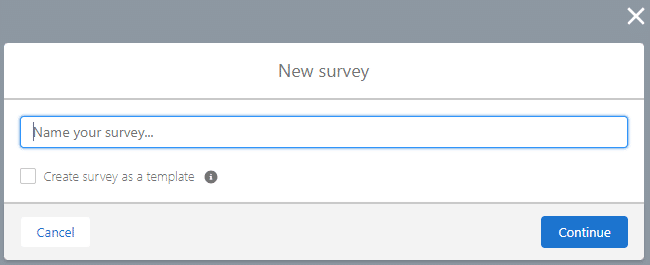
4. Fill in a name in the Survey Name field. This field is mandatory.
5. Click the Create survey in Salesforce as template checkbox to add this as a template. This is optional.
6. Click the Continue button. The Salesforce Survey Builder opens.
7. Add a welcome message to the Welcome Page. If you don’t want to use the Welcome Page, click the Disable (eye) icon.
8. Click the Add Page + icon.

9. Type a name for the page in the Page Name field. This is a mandatory field.
10. Click the Add Question button.

11. Select an option from the list. In this example, we selected the Like or Dislike option.

12. Type the question in the rich text field. This is a mandatory field.
13. Use the drop-down list to select an icon pair.

14. Click the Gear icon to mark a question as required.

15. Click the Add Question button.
16. Select an option from the list. In this example, we selected the Picklist option.
17. Click the Add Choice option.
18. Type options in the fields.

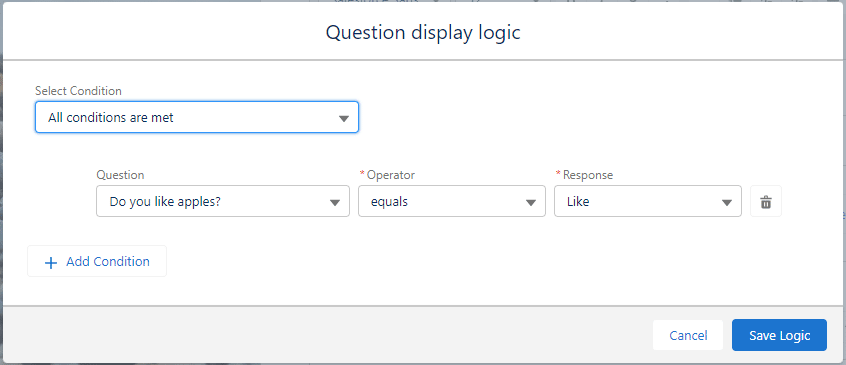
19. Click the Display Logic option.

20. Configure the condition and click the Save Logic button.
21. Click the Thank You page and type a message.

22. Click the Branding button and configure the necessary branding. You can change the following:
- Progress Options
- Background Image
- Logo
- Logo Background
- Button Labels
- Content Card
- Question Text Color
- Answer Choices
- Start, Next and Finish Buttons
- Previous Buttons

23. Click the Review button. If there are any errors, follow the prompts to correct them.
24. If you are happy with the preview, click the Activate button. Activate your survey to send it to participants. Active survey versions can’t be edited, but you can clone them to create a new version.
Send The Salesforce Survey
1. Click the Send radio button in the top middle of the screen. You have two options:

2. Get Invitation – Generate a link or QR code to share via chat, social media, etc. You can send the survey link to participants inside or outside your company.

3. You can only generate survey invitations for participants outside your org if your Salesforce admin enables Digital Experiences. Then select a default Experience Cloud site on the Survey Settings page.
4. Send Email – Embed a question or a link to the survey in an email to individuals or a group.
5. Embed a survey link or a question in an email and get a preview before you send it. Pro Tip: Embedding a question improves response rates.

Analyze Salesforce Survey Responses
As soon as participants start completing the survey, responses will be stored. You can view the data by clicking the Analyze radio button. You will also find the Survey Metrics and Response Dashboard on this page.
How long does a Salesforce Survey implementation take?
The longer your Salesforce survey is and the more conditional logic you add, the longer it will take to implement. This Salesforce implementation guide will help you with the basic steps to configure a survey. There are several Salesforce implementation guides available to assist you with more complex configurations.
Titan Survey as an Alternative to Salesforce Surveys
Titan Survey is a powerful survey tool that integrates with Salesforce. It helps you to create, send, and track any type of survey. Titan Survey offers a variety of features that make it a powerful tool for collecting feedback from your customers, employees, and other stakeholders.
Here are some of the key features of Titan Survey:
- You can create surveys without any coding knowledge with the easy-to-use drag-and-drop user interface.
- The Titan Survey package has a wide variety of survey question elements that you can use to create questionnaires for Salesforce.
- You can customize the design and appearance of your surveys to match your business’s branding.
- Titan Survey provides detailed Salesforce survey reporting so you can analyze the results of your surveys.
- Titan Survey provides seamless Salesforce integration where you can easily view and manage your surveys.
- It has several distribution options that integrate with Salesforce Reports, List View, Objects or Automation. You can also send an external link.
Here are some additional benefits of using Titan Survey on the Titan platform:
- Compared to other survey tools, Titan Survey is a very affordable option.
- Titan Survey can easily adapt to meet your needs as your business grows.
- With top-notch security measures in place, Titan Survey is a trustworthy platform that complies with industry standards.
- Additionally, the support team behind Titan Survey is dedicated to helping you in maximizing the benefits of the platform.
If you are looking for an affordable no-code survey tool for Salesforce, Titan Survey is a fantastic option.
We hope to see you soon!
Disclaimer: The comparisons listed in this article are based on information provided by the companies online and online reviews from users. If you found a mistake, please contact us.
You might be interested in
Writing Your First Notarized Letter Like a Pro

How to Remove Track Changes in Word

Signee Vs. Signer Vs. Signatory: What are They?

All-in-One Web Studio for Salesforce