


Email-to-Case with Salesforce | Setup and Best Practices

The Email-to-Case feature in Salesforce can be found in the Service Cloud. Organizations use this nifty automation tool to receive and send emails from customers. The best part about using Email-to-Case is that your service agents can communicate with leads or customers directly from Salesforce.
And that’s not all. Install Email-to-Case in Salesforce to convert the emails you receive into logged cases for your support teams to investigate.
Join us in the article below to learn more about Email-to-Case.
Salesforce Email-to-Case Setup
If you are interested in syncing all your cases directly into Service Cloud, you can do so with Email-to-Case. This automation tool adds the email address you use for support cases to Salesforce.
Your cases will be given a priority level and queued by default. Email-to-Case will also forward your issues to your support team for them to pick up. So, if you are ready to get started, please follow our easy setup guide below.
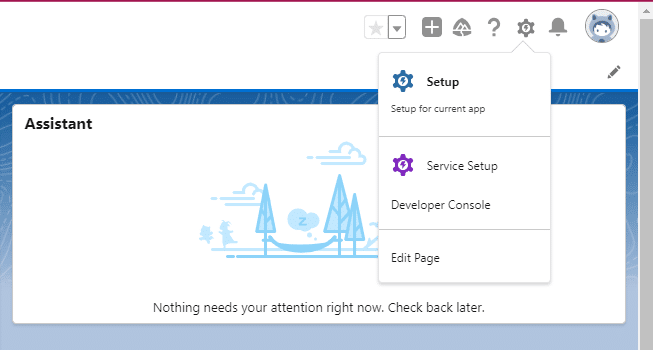
1. Click the gear icon in Lightning Experience and choose Service Setup.
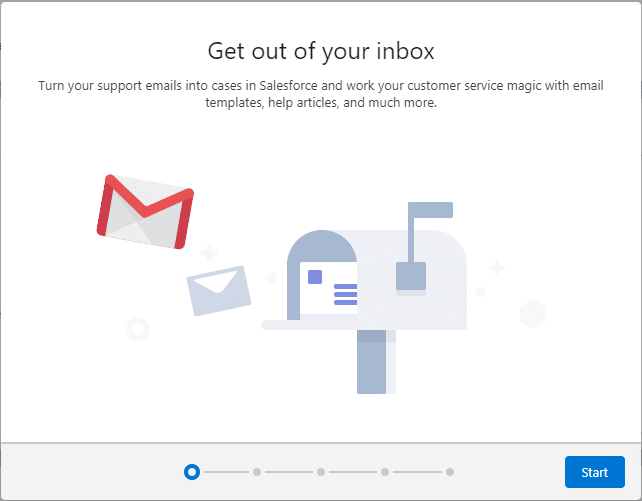
2. Choose the Connect Your Support Email tile to open the setup flow.

3. Click the start button on the setup flow and complete the guided instructions. You will have to add your support email address, configure your queueing, and define a priority for cases.
4. Verify your email address and set up email forwarding between your email provider and Service Cloud. And it’s that simple!
5. If you want to customize your Email-to-Case page further, head over to your settings and update your requirements.
Send an Email to Salesforce
As you receive customer emails, you can ensure that your email provider, like Gmail or Outlook, forwards them to Salesforce.
It’s important that you set your email forwarding capabilities properly in Email-to-Case so that your support emails are attached to the correct cases in Salesforce.
Behind the scenes, Email-to-Case actually works by checking email header information and matching it to a Salesforce case. So, remember to ensure that your email provider does not change the name of the headers when forwarding them to Salesforce. If it does, Email-to-Case will not be able to identify the email properly, so it cannot be added to the case email thread.
Contact your specific email provider to set up email forwarding. You will need to make sure to provide the email service address that you generated with Salesforce for the mail setup. This is the address that your email provider will forward emails to.
If you need the service address, you can find it easily in Salesforce. Simply go to Setup and then the Email-to-Case page. Make your way to the Routing Addresses section and you will see the routing address is displayed as an auto-generated service address.
When you configure your Salesforce Email-to-Case functionality in Salesforce successfully, your customer service teams have access to a full version of all your customer email interactions.
Apply these Best Practices in Salesforce
After you correctly set up your email forwarding to Salesforce, you also want to ensure that your emails are stored in threads correctly. Take a look at these best practices for Email-to-Case Salesforce to have seamless automation.
1. Commit to a Single Email Address
You do not want to have multiple service addresses visible to customers. Make sure you only provide one service address and configure it for email forwarding. When customers email different service addresses, your communication threads will be incomplete and inconsistent.
2. Resist adding Multiple Service Addresses to a Single Email-to-Case Service Address
Many organizations assign aliases to service addresses to track locations. For example, [email protected] or [email protected].
We suggest not adding all your service addresses to the same Email-to-Case service address since this feature will send many duplicate emails to Salesforce. These automation errors will lead to errors in your email threads.
3. Stay Away From Disclaimers in Email Subject
Sometimes, you can add rules that insert tags next to an email subject. A common example of this scenario is using an external tag.
These tags will change the subject of your email and will lead to errors in your communication threads.
While discussing changing email subjects, it is worth mentioning that when your customer edits the email subject, the change will affect your email headers and threading in Salesforce, too.
Make sure to pay attention to these changes.
Email to Lead | Salesforce Apps
Before we end the article, we would like to discuss adding lead data from emails to Salesforce. It’s a common topic that our readers want to know more about.
Email to Lead, also known as Email2Lead or LeadFromEmail, is a free Salesforce app. You can find it on the Salesforce AppExchange marketplace.
It collects your emails from your inbox and pushes the data to Salesforce to create leads. This automation feature lets your employees skip manual work and get straight to generating new sales faster.
Salesforce Email Limits
Let’s end the article properly, with some Salesforce Email-to-Case limits. First up, Salesforce’s Email-to-Case service ensures that your incoming emails remain outside of your firewall. Salesforce has this rule in place to ensure very large emails are denied access. Some of the other limitations include:
- The number of emails that Email-to-Case in SFDC can support will depend on all your user licenses x 1000. However, this amount cannot exceed a daily limit of 1,000,000 email messages.
- Your maximum inbound email limit is 25MB, and your outbound email limit is 384KB. These amounts exclude headers, attachments, and inline images.
- Your inbound or outbound email length will be trimmed in Salesforce email message records if they exceed 32,000 characters for email headers and body text. You can request to increase your email body text to 131,000 characters.
Frequently Asked Questions
What is Web-to-Lead in Salesforce?
Salesforce web-to-lead is a feature for forms in Salesforce that empowers you to capture information from potential leads via your organization’s website. And even better, this information is then used to automatically create and store leads in Salesforce.
How does email-to-case work in Salesforce?
Salesforce’s Email-to-Case feature creates cases automatically for you in your customer relationship management platform.
These cases are generated from your received emails.
Customer support teams are fans of Email-to-case since it speeds up manual tasks of adding cases to Salesforce from email inboxes and managing those questions.
Unlimited Salesforce Solutions from Titan
Be in control of all your business processes with speedy automation solutions.
With Titan, you can automate repetitive tasks and processes in minutes. For example, use data collected through web forms to automatically create, route, and score leads.
You can also choose to update records in Salesforce or create reports based on your web form data!
Contact us today to find out how to streamline and automate any process you can think of using our no-code platform for Salesforce.
Disclaimer: The comparisons listed in this article are based on information provided by the companies online and online reviews from users. If you found a mistake, please contact us.
You might be interested in
Writing Your First Notarized Letter Like a Pro

How to Remove Track Changes in Word

Signee Vs. Signer Vs. Signatory: What are They?

All-in-One Web Studio for Salesforce