


Salesforce Leads: The Key to solving Duplicates

Hawk-eye editor with a passion for trailblazing Salesforce experiences
Salesforce Leads: Keep them Clean
Lead generation across many ads and platforms can get messy. It is easy to end up with duplicate Salesforce leads. It happens all the time.
At some time or the other, you have attended at least one, two, or three webinars. Once you sign up, your information is provided and autofill in your browser.
Do you have a system to ensure that duplicate leads need to be marked as such, with all their information correctly merged and clear notes about any follow-up without creating a new record in Salesforce?
Let’s take it one step further.
What if the same person comes back but now gives you an additional piece of contact info?
Each time a lead must send information to our CRM, we must consistently improve our data or, at the very least, not create more clutter.
Don’t underestimate our Salesforce leads
Of course, there are different ways to deal with duplicates.
You can have Salesforce handle the duplicates within the system using duplicate rules, which means that the incorrect data already got into your CRM. A duplicate record was created, and you need to clean up the system from the inside.
Whether they’ve been sitting in Salesforce for a while, duplicate leads are begging your attention. So could you give it to them?

We have a solution that makes us one step ahead of the competition.
Smart Forms for Salesforce Leads
Sometimes forms not only collect data to create new records but also enable or require fillers to update their data. To efficiently update data and avoid duplicate records, you need to cross-check every filler.
You need to find out if he’s registered as a contact or Lead, and if so – update the information in the relevant object. If he is neither – you need to create a new record.
Titan enables you to create flexible, conditioned Get/Push integrations, where you can try and match your filler entered data against your Salesforce records and only then update the information accordingly.
100% Integration with Salesforce with no code

Since the integration works in real-time, it can make an identification right then and there, auto-populate data if you wish, and then update your Salesforce account.
It simply means the bad data never gets into Salesforce, and no admin has to comb through the database looking for duplicates. It also means your sales reps don’t lose valuable time cross-referencing leads they had a vague memory of seeing a few months earlier.
Titan gives you the flexibility for customers to interact with Salesforce in the way that best fits your business needs.
Choose what field or fields you want to use to check against your current records, and then decide what should happen if there is already a record with that Email, last name, phone number, or whatever data point you chose.
Let’s walk you through step by step with Titan
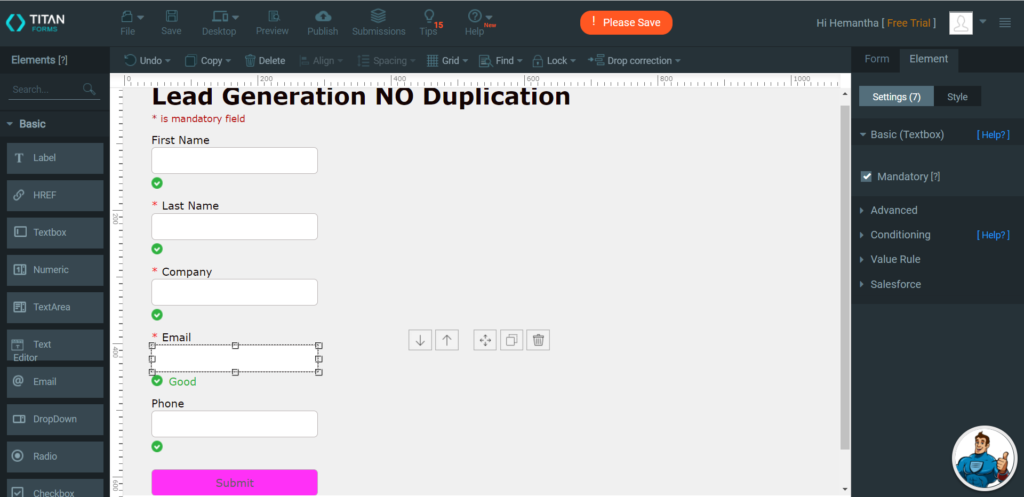
Step One – Build Your Salesforce Form
Drag and Drop elements in the form builder onto your canvas to create the user experience you want for collecting lead information.
In this example, we used a straightforward design of text boxes to collect each data point. Let us name the fields, First Name, Last Name, Company, Email, and Phone.
Take note, that on the right-hand side, under element settings, you need to check the mandatory field under the basic settings for Last Name and Company and Email.
Step Two – Push Integration to Salesforce
Once your form is set up and styled the way you want, head over to your Salesforce Integrations and set your PUSH to Salesforce.

Select the object to that you want to send your data. In this case, we chose Lead because we are creating new leads in Salesforce. However, you can set the action to update so that you can check the Email that the user inputs against other emails already in your Salesforce.
On the right-hand side, toggle “create“ under “if not found any match.”
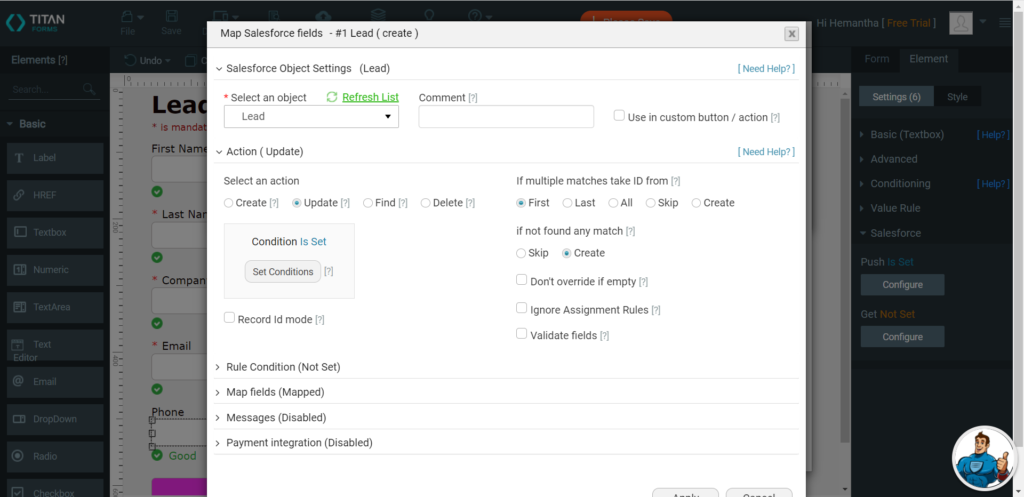
Step Three – Set Your Condition
Click on “Set Conditions” under the update action and decide how you want to identify the Lead against your CRM. Should you want to check the email – choose “Email Equals Email.”

Step Four – Map Your Fields
Now we need to map our fields. Mapping fields is the way that you pair up the fields in your form with Salesforce.
Click on “Set Mapping” under “Map Fields” and choose which field you want to send your data to in Salesforce.
Click “Apply & Finish” and then go ahead and publish your form.
Test it out by filling out the form as if you were a user and then go to your integrations logs, at the bottom of the Salesforce Integration tab under settings. Once there you will be able to see if a new record was created or updated based on the rules that you put in place.

Improve your Salesforce Leads
Watch the short video where we used the Email field to check against other records in Salesforce. There you can see that if the Email is already in Salesforce we asked it to update the information in that record instead of creating a new lead. This is great in scenarios where leads will sometimes give more contact info upon their second time filling out a form.
One-stop solution
It is that simple with Titan, in just a few clicks of your mouse declutter and stop duplicate leads in Salesforce, also available in our Salesforce appexchange page
You can reach out by visiting: