Salesforce Web-to-lead in 5 minutes!

Hawk-eye editor with a passion for trailblazing Salesforce experiences.
Salesforce Web-to-Lead Form: What will I learn?
A web-to-lead form for Salesforce can be set up in under 5 minutes. After following the simple steps below, you can set up forms in Titan , based on your organization’s data model, and push them to Salesforce in live time. Salesforce does have its own tools, but they it is limited. If your organization requires development options you can either make use of time-consuming custom development, or you will need to draw on a third party such as Titan. Read on to find out how to use our no code web builder. No fuss, no sweat: for easy leads.
What are the Prerequisites for setting up a Salesforce Web Form?
You will need Titan Web, which comes in Free, Teams, and Business Pro packages.
What Steps Should I Follow for Web-to-Lead Forms Salesforce?
- Navigate to your active Titan Web project, and drag a few text fields into your form because you will need customers to fill in their information. Titan allows you to be 100% flexible on the layout and decide exactly how you want to brand and visualize your lead form:

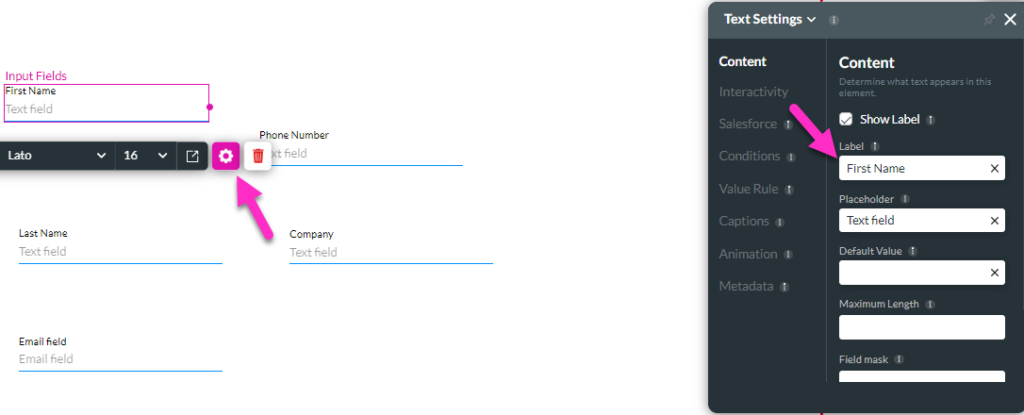
- Next you need to start labeling your lead fields. Do so by selecting a text field and clicking on the gear icon. You can then edit content to match the fields you want in your lead.

Note: Titan Supports any custom logic you have set in your Salesforce.
- Below, the fields First Name, Last Name, Phone Number, Company, and Email field have been created in the lead form.

- Once you have named your lead fields, visit the gear icon on the left of the page, click Salesforce, select Push, and Create New:

- Select Lead as the object in Salesforce, and a relevant Action such as Update:

Note: to understand how the update function helps prevent lead duplication, click here.
- Map relevant fields such as First Name, Last Name, and Company:

Note: when it comes to mapping the Status field, make your lead status static. This is because you don’t want the user to be able to change the lead status dynamically.
Here this is ensured by making it Open – Not Contacted:

- Once you have mapped all relevant fields, apply and close.
- To trigger lead creation, set up a button on your form. Do so by clicking the pink plus button to the left of the screen, and adding a button. Rename the button by selecting it, and clicking the gear icon:

- Give it an appropriate name such as “Create Lead”:

- Next, you need to configure this button to create leads in Salesforce. This is easily done by clicking Interactivity and Configure on Click Action:

- Titan Action flows will open next. Click the pink plus to the right of the start icon, select Salesforce Action, and click Next:

- In this instance, the Salesforce action is a push. Select Lead Update and click Next:

- Finally navigate back to Salesforce to view your new lead.
The Takeaway on setting up Web-to-Lead
You can now set up these forms for Titan Web in 5 minutes flat, by following these simple steps. Choosing Titan means you can do this with our intuitive drag-and-drop web builder, zero code required. Titan’s forms empower you to overcome some Salesforce limitations, such as manual setup, curtailed customization abilities, and the inability to upload files for your lead. learn more about our Salesforce appexchnage solutions
Thanks for reading! Start with Titan now by visiting our product page, and checking out our pricing options.
You can reach out by visiting:

Do you like this How To Guide?
Schedule a demo to get started with Titan today!


