Salesforce Solutions: Customizing the Account Settings Menu

Hawk-eye editor with a passion for trailblazing Salesforce experiences
Are there any Prerequisites?
Firstly, you need a registered Titan Account in Free, Teams, and Business Pro packages.
What steps should I follow?
Here is a quick overview of the Account Settings Menu.
To begin, log in to your Titan Account and click on Settings on your Titan Dashboard.

Select Account Settings.

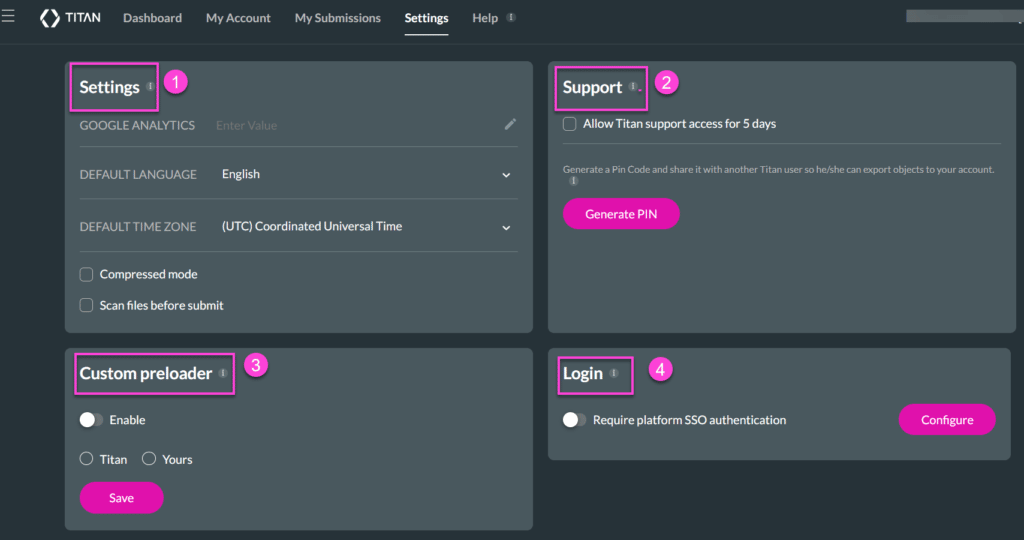
The Account Settings Menu is divided into four tabs:

1. Settings
Under Settings, tab user can achieve the following in just a few clicks:
a) Configure Google Analytics by entering a value.
b) Set up a Default Language and Default Time Zone.
c) Enable Compressed mode to compress large images without losing quality.
d) Enable Scan files before submit function to scan files for viruses.

2. Support
a) Allow Titan support access for five days to allow the Titan support team to view and resolve reported issues directly from your account.
b) The Generate PIN element allows other Titan users to export forms from one organization to another.

3. Custom Preloader
a) To show a message, reinforce branding, or interact with users, enable the Custom Preloader.
b) Select Titan to give you several options to choose from or,
c) Upload the chosen URL to display your own preloader by selecting Yours.

4. Login
The Login feature allows you to:
a) By enabling the Require platform SSO (Single Sign-On), a user can use only one login credential.
b) Click on the Configuration button, where information such as SSO login and logout URL, Download Certificate, Certificate, Signed request, etc., must be filled in.

To learn more, visit the Account Settings page or check out our intuitive tutorial video on the Account Settings Menu.
Titan’s Takeaway for Salesforce Solutions
Want more information on the steps covered in this article? Book a demo with one of Titan’s consultants today, and find out why Titan is the #1 powerful no-code digital platform for Salesforce.

Do you like this Titan Guide?
Contact us today to uncover more tips on getting started with Titan!


